Wednesday, March 26, 2014

LipStick Love: The Color of the Year - Radiant Orchid.


 The other day I was in Sephora, okay lets be real, when I am not in Sephora? I saw one of the girls that worked there had a GORGEOUS lip color on. She was talking to another girl about how that color would launch tomorrow. Well, since I had just returned a few items and had a bunch of store credit you better believe I was going to come back the next day. And when I did I discovered THE COLOR OF THE YEAR. I'm not sure if this is just a clever marketing ploy, actually I'm pretty sure that is exactly what it is but I don't care one bit because I am loving this color. It's called Radiant Orchid and its all kinds of beautiful.


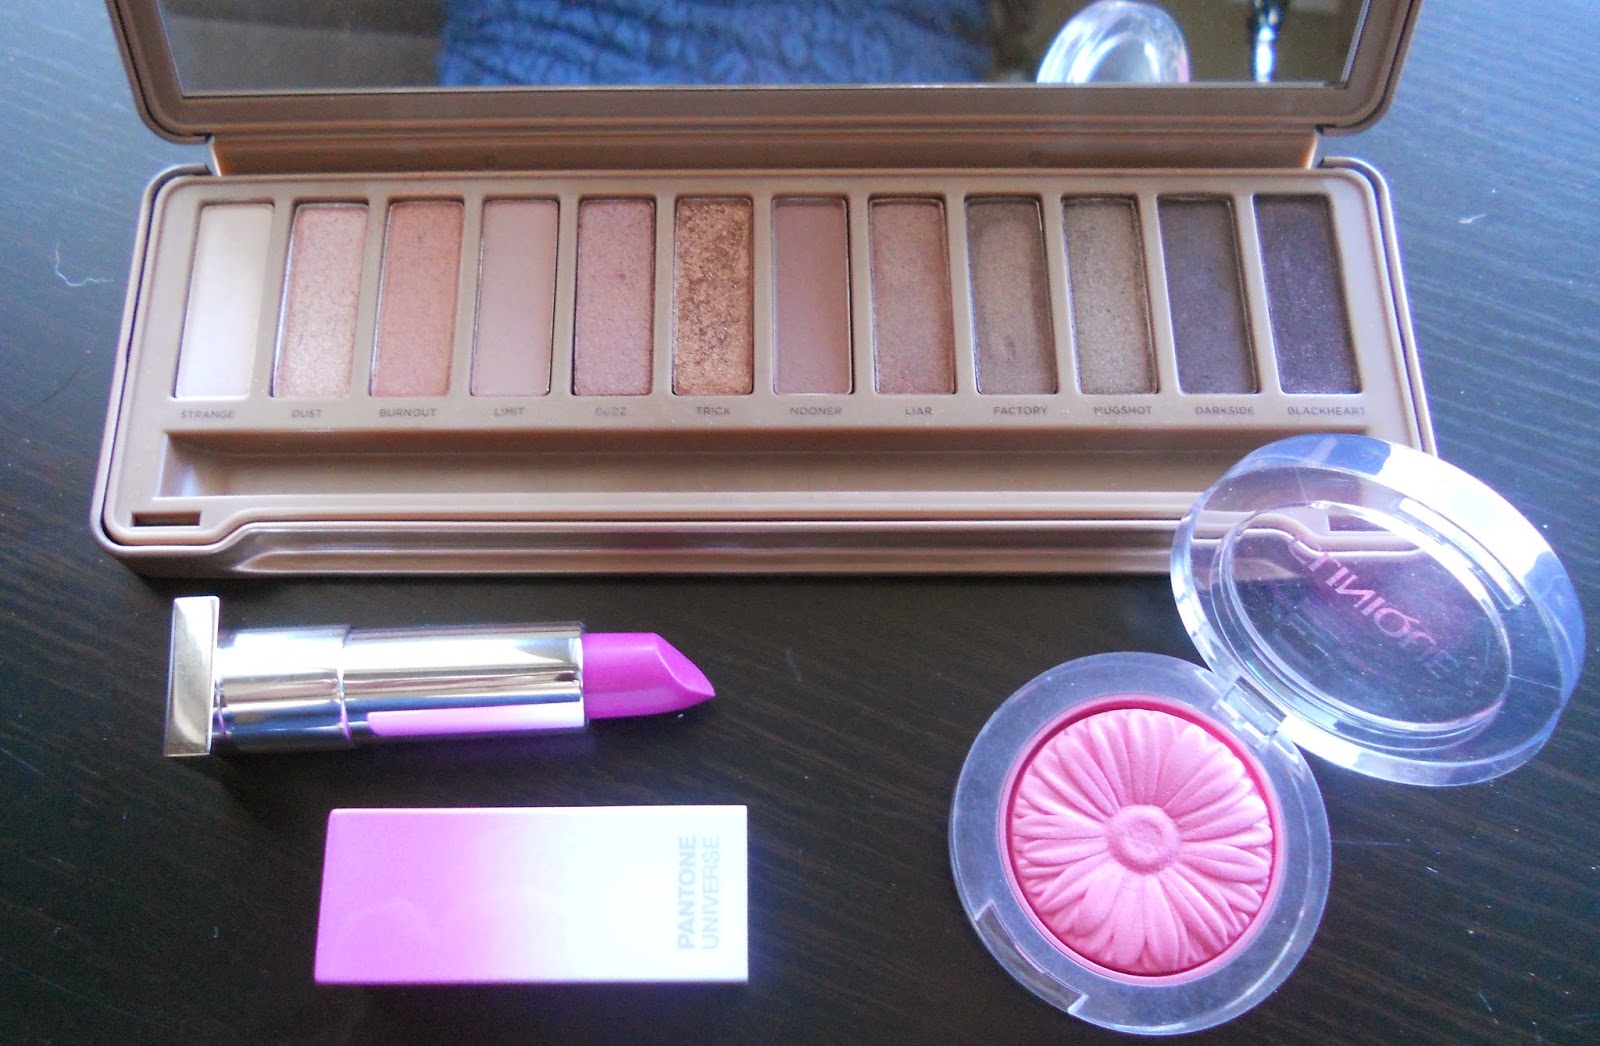
It comes in the coolest packaging, a white box with a transparent cover. It's just kind of nestled in there. I'm such a sucker for cute packaging, but who isn't!? This is marketed as a "matte" lip color but I think I would say it has more of a satin finish. In fact, I was just reading the description on Sephora's website and that's exactly what it said "a satin finish". Why in the world is it called a matte color!?  

The lipstick packaging is really cute also, it has a magnetic closure and is rectangle shaped which makes it stand out from most lipsticks. I also love the white to purple ombre on the outside and the silver tube on the inside.

It looks beautiful on its own or layered with a gloss. I do wish it was a bit more long wearing, I find myself having to reapply throughout the day but its not a deal breaker for me. I just looked on the website again and it says it has an: "all-day wear that rivals the lasting power of a lip stain." 
No. 
Just no. Its doesn't.
 Stop lying. 


The full name of this lipstick is: Sephora + Pantone Universe Radiant Rush Matte Lipstick ($18) (that's a mouthful!) Its sold out on the website right now but might still be available in store. I do think its worth going and picking up if you're a fan of bright colors and limited edition products. I love both so this is right up my ally.


So there ya have it, color of the year gets a stamp of approval from me! (Even though I DO think the description is misleading) When I wear colors like this it makes me think spring will come along and then summer right behind. Wishful thinking I know...


Monday, March 24, 2014

All About The Eyes: How To Do Quick Eye Look


The Naked3 Palette has been my go-to for this past month. My hubby got it for me for Valentines Day and I've been using it non-stop ever since. Another one of my favorite products ever is Mac's pigment in Tan. These two together go so well with the spring trends of bright lips and cheeks. So lets jump into the eye look, its quick, its easy and its beautiful!


First Step: Take a dark maroon color (I'm using Nooner from the Naked3 palette) on a fluffy brush and apply it in the crease going all the way from inner to outer corner. You don't need to be super precise just get the color on the crease.


Second Step: Using a flat shader brush add a sparkly champagne color all over the lid. I'm using the Tan Pigment from Mac which I LOVE. Its such a beautiful shimmery color. You could also use one of the shimmery shades in the Naked3 palette.


so much beauty in this color!


Third Step: Add liner and mascara. Check out my post all about liner here: Eyeliner How-To


Fourth Step: Fill in your brows and smudge a bit of the dark maroon color under your eyes. This will add a bit of depth to the look. After your brows are finished use a matte cream or white shadow right under your eyebrows to smooth everything together.


Last Steps: Apply your foundation, blush and lipstick. Here I used one of my favorite new products, the Clinique Cheek Pop blushes, this one is in Plum Pop. I also used Sephora's Radiant Rush matte lipstick (which I have a blog post about that will be coming later!)  

You are now ready for spring! If you try this look out send me a picture, I'd love to see how it looks on you!

Want to take it to the next level? Add black or brown liner to the waterline, add another darker color in your crease and top the lipstick off with a darker gloss. You've got yourself a beautiful nighttime look. You could also add false lashes or switch up the lip color completely.


Thursday, March 20, 2014

All About the Eyes: How-to Do Your Eyebrows - Do They Really Matter?


How many people skip their eyebrows in their makeup routine? *3/4ths of the room raises their hand*. How many people are going to start doing their brows after reading this post? Hopefully everyone!

Here's me, makeup done, eyebrows neglected.

And TADA! Add the eyebrows! See the difference?! The eyebrows frame the whole face, not just the eyes. Its crazy how much any makeup look is completed by adding a little TLC to your brows.


My favorite product HANDS DOWN is the Anastasia of Beverly Hills Brow Wiz Pencil. ($21) This little guy lasts me about six months or so that's how I justify the price.You can easily mimic brow hairs with this pencil because the tip is so small and the other end is a spoolie that you can use to comb your brows to keep them nice and organized.


First things first, make sure your brows are maintained. Get 'em waxed, tweeze them, whatever it takes to keep those babies in place. Thicker, fuller brows are very popular right now and mine are on the thinner side so I like to fill them in on top and bottom to add fullness.


Step One: I use my Brow Wiz Pencil spoolie end to comb the brows into place. Then I use the other side to draw an outline. I go right underneath the natural shape, just making it a bit larger and on top I usually follow the hair that is already there making sure to keep the arch.


Step Two: Taking a tiny bit of the Anastasia DipBrow Pomade in Chocolate ($18) on a angled eyeliner brush I warm the product up on the back of my hand and start on the tail end of my eyebrow. The tail should be the darkest and I have a spot right around here on my brows that hair just doesn't grow.


Step Three: Slowly I start to build up the color, adding a bit here and there wherever I see that it needs some. You don't have to use the Brow Pomade, you can just use the pencil to do this as well. Mimic your brow hairs by using short strokes.


Step Four: Using the spoolie I blend everything together and put the hairs in place. Add brow gel and there ya have it!


-Extra tips-

You can use concealer on a small brush to clean up the edges (I never do this cuz I think it looks fine without this step but it can be useful)

Always follow the natural shape of your brows. Don't over wax or over tweeze or over trim!

If you already have very full, very well shaped brows this is not necessary. (but that is a rare find)

It can be very easy to get heavy-handed and over-do brows. Use a shade a bit lighter then your natural hair and use small light strokes. Be in good lighting also, nothing worse then doing your makeup in the dark and going outside to find your eyebrows look like your grandfathers. (old men always have such huge eyebrows!)

There are so many different things that can be used, powder, pencils, shadow, wax. Figure out what works best with your brows. I used shadow before I discovered the Brow Wiz. I also sometimes only use the Brow Wiz and no Pomade depending on how dramatic I did my makeup. The more dramatic the makeup-the more dramatic the brows should be.

For a quick makeup look use mascara, blush, and do your brows. Throw on a lipgloss and you're out the door with your face looking complete but without taking forever on a full-on glam look.

So clearly, yes. Eyebrows matter. That is all I have to say about that question.
Any other questions about those two hairy things above your eyeballs? As always, ask away!


Monday, March 17, 2014

Meaning: Those Quiet Moments.


This whole time change set your clocks back thing always messes with me every year. I know it was a few weeks ago but my sleep schedule has still been weird. I haven't been able to fall asleep right away these  so I'll usually scroll through Instagram, Twitter or Facebook on my phone until I get tired. The other night that  didn't work, so I decided to play a little Freecell on my phone (don't judge, I know its a nerdy card game). 
As I tried to make the cards go where they were supposed to go I started to reflect back on my day. Just thinking about all the things that had happened, the conversations I had, the way I reacted to certain situations, what I thought of the people I had encountered. Without even realizing it I dissected how and why I felt certain ways. 

Its too rare of an occasion that we have time to reflect. We are so busy with so many activities to occupy our time that we don't take the moments to understand ourselves and our lives. I know that I feel time is wasted if I'm just playing a game on my phone or mindlessly watching TV. But sometimes we need that, we need the moments where our brains are busy but also able to think. 

My husband loves to come home after a busy day and just veg out and watch TV. Doesn't matter what he's watching, it could be the stupidest show like The People's Court, and he will just sit there and relax. I never could understand it, why would he want to watch something he didn't care about? But I'm slowly starting to understand that he needs that time where he doesn't have to think or respond, he just has to "be". He knows this about himself, he knows he has to take those moments to let himself relax and think over the day without literally sitting there just staring at a wall thinking. That wouldn't work well for him, he would start making up a game to play with the wall or something silly like that. It wouldn't work for me either, I would stare at that wall and think of all the things I SHOULD be doing. 

But late at night, cuddled in bed, playing Freecell did work for me. As I was laying there, listening to my husband snoring beside me, cozy and warm under the quilt my aunt and Mom had made, our dog sleeping in her bed beside ours, I was filled with the peacefulness of the moment. I thought of how God had given me so much to be thankful for and allowed myself to rest in the contentedness that I felt. 

A healthy husband, a cute dog and warm bed isn't something I regularly thank God for. Its not something that on an everyday basis I'm glad that I have. Those moments pass me by so quickly and I don't allow them to wash over my soul. But in that moment? I did. I felt that peacefulness deep inside my heart, I felt the beauty of the moment and it was something that I want to embrace more often.

Quiet moments for the soul.

 Figure out where that moment will work for you, for me its in the silence of the night, for my husband its in the background noise of the TV, where will it be for you? What will you feel when you allow a moment to wash over your soul? What will you discover about yourself? About whats important to you?

Take the time, find the meaning.


HairDo's: How to Do The Poof VIDEO


As I was trying to write out how I do my poof I realized it would be one million times easier just to SHOW it. And so I tried my hand at recording a video. Its much more difficult then it sounds. I figured it would be easy as pie, I would just explain how I did it right? Wrong. But I gave it a shot anyways and even though I just ended up laughing at myself I thought maybe it would help someone so here it is!


Take a section of hair starting at the arch of each eyebrow, pull it back and then kinda "push" it forward and pin, criss-crossing your bobby pins. Leave it like that or add a bun or ponytail!


Thanks for watching! Send me a pic if you try and it and as always leave any questions below.


Thursday, March 13, 2014

Style Haul: Updating Your Wardrobe, Without Breaking the Bank


This time of year I always get the itch to update my wardrobe. Its spring, there are good sales and I"m done with winter fashion.(Actually I'm done with all things winter.) But at the same time I don't have an unlimited budget(who does?) and I can't go buy a whole new wardrobe just because I'm over winter. So whats a girl to do? Well here is my style tip for you all:

         The best way to update your closet is to get things that will
                                                                                   go well with the clothes you already have! 

The other day one of my coworkers commented that I must have a ton of clothes because I'm always wearing different outfits. I told her "not really, its just most of my clothes go together really well so there are more outfit possibilities." When you're out shopping don't just get things you like, get things you know will go well with what you have. Stick to neutral colors when you're looking to do a bit of updating and everything will most likely work together. So keeping that in mind, here's what I picked up.


I love these types of sweaters because they are lightweight, can be worn over so many tank tops or shirts and they add a bit of style to every outfit. I found this one at Windsor and it was $18.90. I love that its black and white which makes it very versatile and I love the loose flowy fit. 


I found this grey and white sweater for 50% off at Express. I think this with a white tee and some colorful jewelry will be perfect for spring.


Another awesome 50% off find at Express, this animal print sweater will be easy to dress up for work or dress down for a day of running errands. 


Like I said I love these flowy type sweaters and this one is made of super thin material which will carry over to spring and summer very well. Its a light tan color so it will go with EVERYTHING. I'll get tons of use out of this and the best part? I found it for $11 at Macy's!


This tank top from Windsor is probably my favorite thing out everything I got. I love the crochet/lace detail. This type of look is everywhere this spring. There are so many shirts and shorts with this detail. Its so delicate and feminine. I saw something very similar in Express but it was $44 so that wasn't happening. When I saw this one at Windsor and saw it was only $18.90 into the dressing room it went and then right into my bag. Love.


Now this shirt has nothing to do with updating your wardrobe but how cute is it!? I got it for a sleeping or "bum around the house" shirt and it was THREE BUCKS at Macy's. Winning.


While at Express I saw they were running a "buy one pair of jeans and get the other for $29.90" sale. I love the fit of Express jeans but they are $80!! I had in mind that I wanted a pair of gray pants and a pair of army green ones. I discovered these two which fit the bill perfectly. I had a $60 off your $150 purchase coupon so the pants with the two sweaters ended up being right around $100! That's $25 each. And that makes me (and my wallet) happy happy.


These are the Stella low rise pants. I have them in black and tan as well and LOVE them. They have such a soft fabric and my other ones have lasted me through an entire year (and I wear them all the time). I think these with the lacy top I got from Windsor will look awesome together. The contrast of the feminine top mixed with the army green bottoms will be perfect.


These are the mid rise Mia ankle jean legging. They are technically jeans but look more like pants. I like the mid rise alot better then the low rise. They have some destruction which almost made me not get them but its very subtle so I figured it'd be okay. A pair of gray pants has been on my wish list for quite a while now so I was super glad to find these. And the fit is perfect!


I want to put up some outfit of the day posts so stay tuned to see how I style these pieces!


Wednesday, March 12, 2014

All About the Eyes: Eyeliner How-to


 Last time we talked about the kind of eyeliner to use. Now that we've got that out of the way lets discuss how to apply. We'll start with the four steps I take when I do mine and then I'll give ya a few extra tips at the end. Just remember this is how I like to do my eyeliner. There are many other ways that it can be done this is just the one I've found that works best for me.


1. I always start on the inner corner of the eye. Using the very very tip of the brush get as close the the lash line as you possibly can and drag it towards the end of your eye. Take the line about half way across your eye. For a beginner I would recommend using very short strokes. Don't get mad when you first are trying it out, it takes a bit to get the hang of. 


 2. After you've got the inner corner taken care of flip your brush over and starting at the outer corner of the eye drag it towards the inner corner to meet the part you already did. Don't feel like you have to drag it all the way to meet it, just let it go however far it wants to. Everyone's eye shape is different so it won't come out exactly the same on you as it does on me.


3. Now connect the two parts. I like to flip my brush around again so I can really use the small part and slowly build it up. I use short strokes to make the line thicker if I want to build it up a bit or I just stay really close to the lash line if I want a thin line.


4. The last part is the flick! Now even if you don't want a true "cat eye" look you can use a tiny little flick at the ends. I almost ALWAYS flick my end. It makes your eyes look bigger and while it might look a little weird and like its "too much" at first once you add mascara it blends right in. How I like to do my flick is to flip the brush over again and put the very tip where I want my flick to start and then drag it backwards. Using small strokes and the tip of the brush I fill in the area until it looks perfect. 


This is really something that takes a bit to get the hang of but once you do, it can be done quickly but look like you spend alot of time on it.
I think it completes any eye look and it also makes your lashes look longer and thicker. Win!


-Extra Tips-

Use the small tip of the brush as much as possible, its much easier.

Always put this type of liner on AFTER you've done your eyeshadow but BEFORE your mascara. It will save you so much trouble.

With this type of look black is the way to go. Colored or brown liner is a whole different ball game.

Stay as CLOSE to the lash line as you can, if you have a gap between your liner and your lashes it will look all kinds of crazy.

Don't be afraid to go over it a few times. I will admit, some days my line starts out thin and ends up getting thicker then I wanted. No worries! A big mistake made in makeup is thinking that it needs to be perfect. Trust me no one will notice if one side is a little thicker or longer. Your eyes are sisters not twins, it doesn't matter if it doesn't come out perfect.

Tilt your head up and look down into the mirror as you apply your liner. Like this:


Practice, and take it slow at first. Don't get mad and smear the liner everywhere. That happened to me one time. I got so angry cuz it wasn't coming out right I just smeared it all over my eye. Then I had to do my makeup all over again. Eyeliner fail.