Sunday, August 3, 2014

AllAboutTheEyes: Milani Bella Eyeshadow :TWO Looks and a Dupe! CLOSED GIVEAWAY!

<a href="http://www.bloglovin.com/blog/12733801/?claim=99yxnc26xnb">Follow my blog with Bloglovin</a>

I was pretty excited to create some looks using these shadows! For more information about them check out my previous post:
DealsAndSteals: New At The Drugstore: Review on Milani's Bella Eyeshadows

These are easy looks that anyone can recreate!

Let's start with Bella Caffe and Bella Mandarin.

After priming your eyes using your favorite primer or concealer take Bella Caffe on a fluffy crease brush and sweep it back and forth over your crease in windshield wiper motions all the way from inner to outer corner. 


Now using a flat shader brush or your fingers add Bella Mandarin onto your lid. Use patting motions to build the color up until you like how it looks.


I LOVE the peachyness of this color. It's so fresh and makes your eyes look awake and its just so perfect for summer.
Add mascara and a highlight color to your brownbone and you are done! SUCH an easy pretty look that can be done super quick.


Now this second look is a bit more fun!


I'm going to be using Bella Rouge and Bella Copper for this one. After priming your eyes use your favorite transition shade in your crease for easier blending and added definition. I used Soft Brown by Mac.
Next, using a flat shader brush apply Bella Copper all over your lids and into your inner corners. 


Now using a small fluffy brush add Bella Rouge into the outer corners of your eyes and blend blend blend. Continue building up the color until you like the results. Then take the same color underneath your eyes and blend that as well. This will give the look a bit of an added pop.


Add your favorite black liner to your eyes, as close to the lash line as possible and a nude or white color to your water line. Sometimes when using pinks or purples it can make your eyes look tired or bruised so the liner is very important. The black liner will bring some definition to your eyes and the white or nude will make them look more bright and awake.


Add a highlight shade to your brown bone and your eye look is complete! 
Now I have a little secret for you.
 On my right eye I used Bella Copper but on my left eye I used Mac Amber Lights. 
They are THAT close in color.


Amber Lights is slightly darker in the picture above but I think it was just how the light was hitting it. 
Amber Lights is $14 and Bella Copper is $4.
 I mean....the choice is easy.
 Bella Copper has a bit more shimmer to it but its really nothing dramatic. 
Can you even tell a difference in this picture?


SO since I already have Mac Amber Lights I'm going to give away Bella Copper to one of you!
All you have to do is:
- subscribe or follow my blog so you can keep up on all things beauty.
AND
- leave me a comment telling me YOUR favorite eyeshadow. 

I'll pick a winner on August 12th!


Thanks for reading!


Thursday, July 31, 2014

DealsAndSteals: New at the Drugstore: Milani Bella "Gel Powder" Eyeshadows Review


I'm always excited when I hear about a new drugstore product. They are less expensive and easier to find then the high end stuff. And when they work I love to be able to tell you guys about them! So when the beauty community started to buzz about these new shadows I stalked my local Walgreens and CVS until they were in stock.
These are called the Bella Gel Powder eyeshadows, they aren't very different from normal eyeshadows as far as the "gel powder" part goes, I think its just a marketing ploy to create interest.


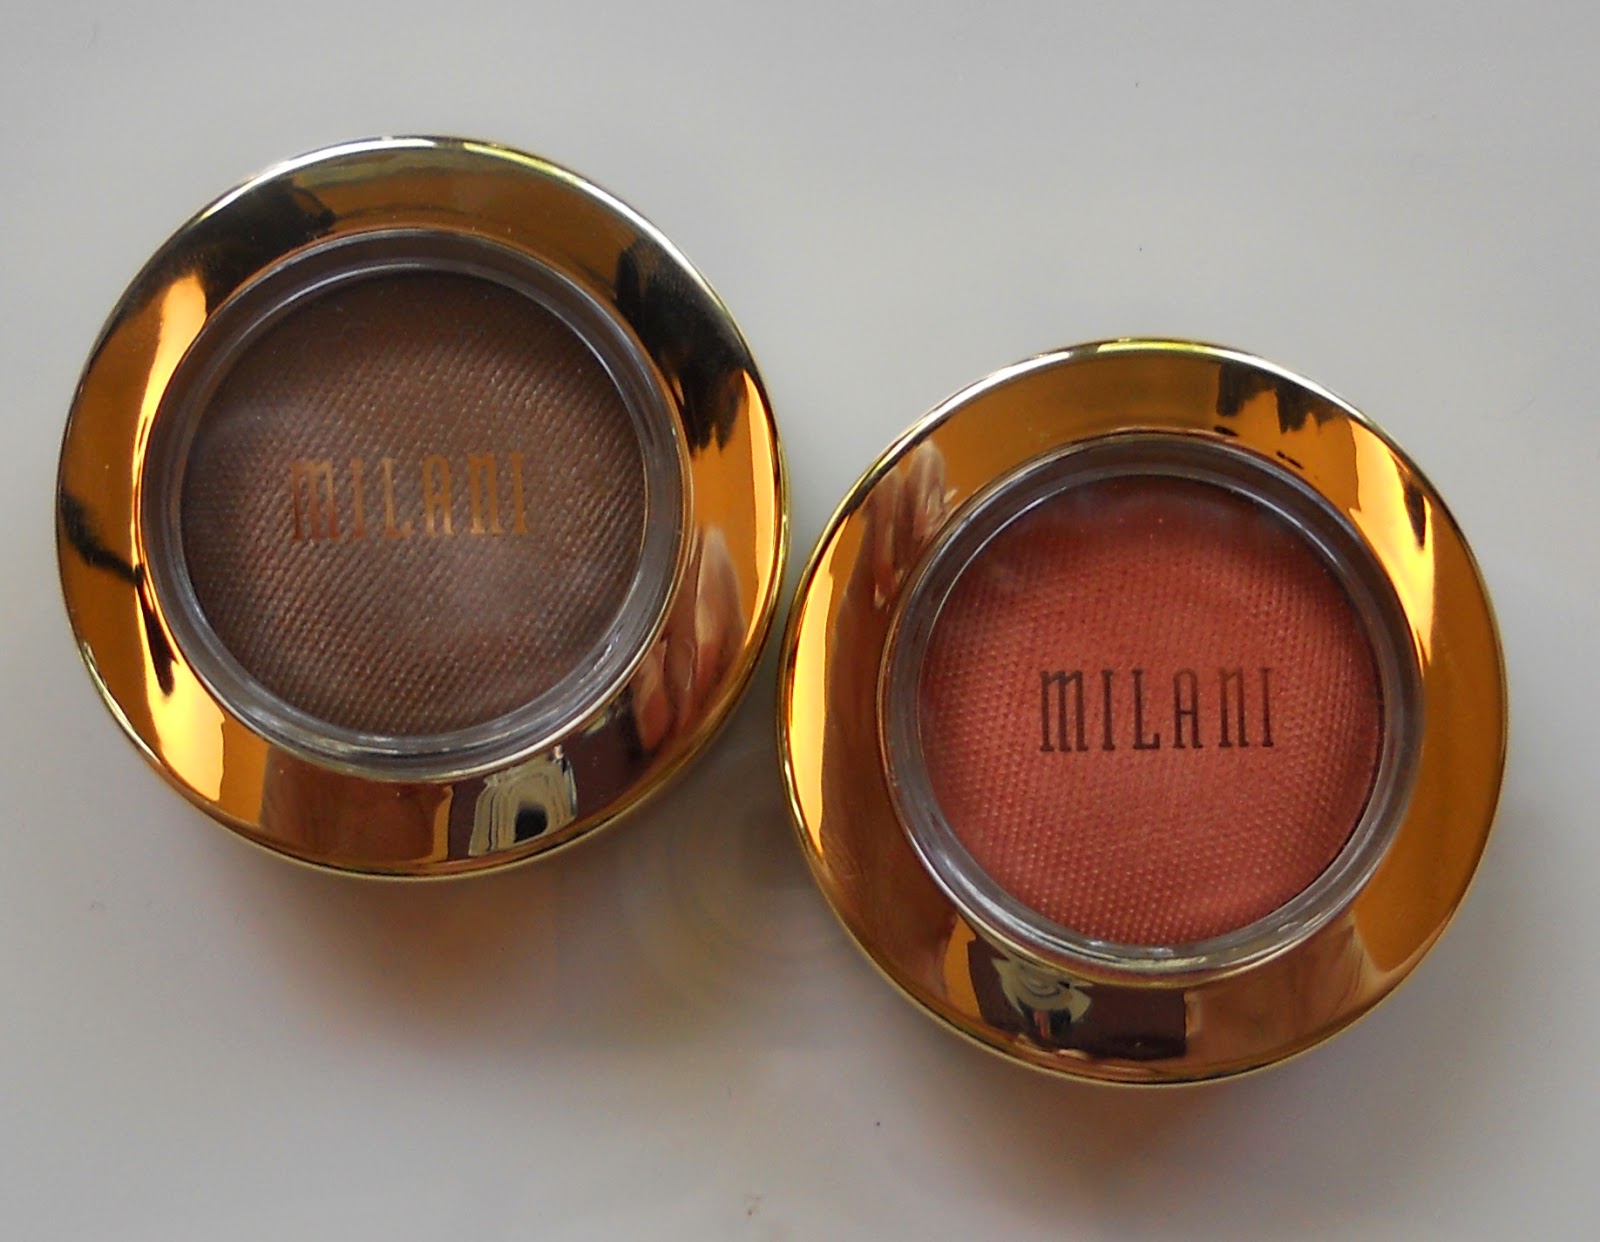
I picked up four different shadows to really get a sense on if these were any good. The first two are Bella Caffe (a cool tone brown) and Bella Mandarin (a super unique peachy orange shade).


Bella Mandarin- this is a called a "satin matte" finish which is a really great description because it has just a slight sheen to it without being shimmery (that kind of finish is the best for more mature skin). This color is so different from anything I've ever seen. I love it on the lid or in the crease. Its a perfect summer shade.

Bella Caffe - another "satin matte". A great brown is so hard to find at the drugstore! But this one fits the bill perfectly. Its an awesome shade to use as your transition shade in your crease to help blend your shadows. Its a cooler tone brown, I usually like warmer browns but this still gets a thumbs up from me.

You can see in the picture below that these shades aren't super bright which is good because when you are using shades in your crease you want them to be a lighter wash of color.


And then I went back for seconds and grabbed Bella Copper (a stunning golden color) and Bella Rouge (a beautiful pinkish purple shade).


Bella Copper - this is marketed as a "metallic" color. IT IS GORGEOUS. So pigmented, so easy to work with. Super long lasting. Its just beautiful. I found that it is a dupe for a high end product that I will let you know in my next post. And since I have a dupe for it I will be giving away this shadow to one of you! (Don't worry I will sanitize it first!)


Bella Rouge - another metallic shade that is again, beautiful and unique. This one would be beautiful all over the lid, or used wet as a eyeliner for an awesome pop of color. It was very long lasting and didn't crease on me. I love that I don't have anything similar to it in my collection and the color payoff is amazing!


I mean I think the swatches speak for themselves - these colors are STUNNING. They blend VERY well. They are easy to work with, I've read that they can be applied with your fingers for an even brighter pop of color or applied wet to really show up. I haven't tried that yet but I'm defiantly going too. I would recommend using a primer before using these shadows as always.

There are 30 different shades, they retail for around four dollars and can be found at most drugstores. I've done some research and all the colors aren't as amazing as these but a majority of them are amazing drugstore shadows.

Keep an eye out for TWO makeup looks using the shadows as well as the high-end dupe and giveaway!


Tuesday, July 29, 2014

HairDo's: Easy Braided Bun Style


This braided bun style is perfect for summertime! It gets your hair up off your neck and away from around your face, its very loose and flowy so its okay if it falls out a little and its just so cute and easy! I'll take things step by step and you'll see how easy it really is.


Start with your hair however you like. Mine was a little crazy this day.


Section off the hair from a bit behind your ear. Clip it so its out of the way.


Take a section of hair from the very front and do an inside out french braid, adding pieces from the top and bottom and working your way down towards the back of your head. Keep it close to your head and guide it so it goes towards the back.


See how its braided almost over my ear? Continue braiding regularly once you can't french braid and then tie off the end. You can also do just a regular french braid if you can't do the inside out one but I think this one looks cooler.


Now take another section of hair, this one smaller and do a french braid the same way you did the other one.


Braid it all the way down and secure it with a bobby pin or an elastic.


Now on the other side of your head braid a tiny little baby braid, just regularly. Secure that one as well.


Gather all your hair loosely to the side that you did the two braids on and put it in a ponytail. Keep it as loose and messy as you can. If you have very fine or thin hair I'd say go crazy with teasing it first.


Take your first, larger braid and pull at it to make it bigger. Don't worry about it being messy, the messier the better! If some of the hair falls out of the braid just use a bobby pin to pin it into place. Next, pin both of the braids into the ponytail. This part you do want to be tight and secure against your head.


Now gather the ponytail into a bun and secure it with another elastic or bobby pins, or both! I used both. Keep it messy, keep it loose. I pulled mine and messed around with it for a bit to get the look I wanted. You should end up with something like this:


Pin the little braid from the other side and pull out random pieces of hair around your face. Then attack the whole masterpiece with hairspray!

If this is a bit too "done" for you I have a second option!

Instead of two braids in the front just do one and take out the little baby braid on the other side. This is a bit more casual if you don't want it to look like you really did your hair. Plus its easier because its only one braid instead of three!

Let me know if you try this style out!


Tuesday, July 22, 2014

AllAboutTheEyes: Sephora Lash Stash To Go


Every once in awhile when I'm on my shopping adventures I find something that makes me think "Wow, what a good idea!" And this product falls right into that category. It's the Sephora Lash Stash To Go and it retails for $25.


In this little package you get FIVE Deluxe Sample Size mascaras to try out. And these aren't just some seven dollar drugstore mascaras, these retail for $18-$25 dollars for each mascara. When I'm going to spend that amount of money on a mascara I want to KNOW that its going to do its job correctly. But is it really worth $25 to try out five mascaras? Well there's one more thing you get in this package, a "Mascara Voucher" that you bring back to Sephora and get to pick a FULL SIZE mascara to take home for FREE.

Now if you're a beauty on a budget check this out: Each mini mascara will last at least a month so if you only open one a month you can get five months out of this package and then another three months out of the full size mascara! So that's eight months, say you had to buy a new drugstore mascara every month at seven bucks, that's $56 or even if you only buy mascara every other month that's still $28. So this is a money saver! Eight months of mascara for $25.


But if you are me, you just want to try them all out right away so you can review them.

Too Faced Better Then Sex- the best mascara of life. I knew I loved this already.

Blinc Mascara- This mascara did not work well for me at all! It was too wet and clumpy. It might have been one of those that would work better as it dried out but I gave it away to a friend to see if she would like it better then me.

Tarte Lights Camera Lashes- This is a a very good every day mascara. It doesn't have a WOW factor but its just a good basic one.

Bare Minerals Lash Domination- I REALLY liked this mascara. It had a very cool brush, it gave great length and volume, the two things that matter the most. 

Lancome Hypnotise Drama- I wanted to love this mascara because I had heard SO many good things about it but it just didn't work very well. Too clumpy and didn't give me the length I like.


So it was an easy choice for me, Better Then Sex still was my favorite, but Lash Domination came in a close second. All in all it was fun to try out all these mascaras and I LOVE that you get a full size one out of the deal.